|
Ankohl Ruins
Items:: Thanatos Mace,
Power Bread,
365 coins,
Vial,
Muni Robe,
210 coins,
Crystal Powder,
Nut
Click to see the full image:
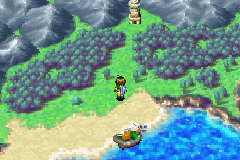 |
It is located in the south of Angara, west of the SE Angara Islet. You should see two beaches and a village (Champa). Land on the northern beach. Go north. It is located behind the forest. |
|
Click here to view the map of floor 1
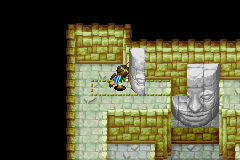
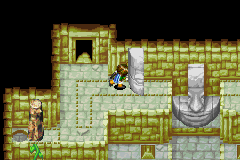
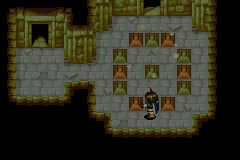
Enter the Ruins by going north through the broken wall and into the building. In the entrance
hall, find your way to the north. Ignore the two bushes you
pass by. When you see three bushes beside each other, use Whirlwind on the middle one. Enter. You will be in
a room with gray statues. Go west and enter the door. In the
next room, go south to the end then head west. When you see
a staircase, take it.
Click here to view
the map of floor 2, left side
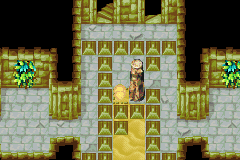
In floor 2, go east and counter clockwise
until you see a sand tunnel on the floor. Use Sand to head
through the sand tunnel until you reach the end. Grab the treasure
chest. A mace is inside. Now head back to the west and
pop out of the sand. Go north and enter the next room.
|
|
|
Click here to view
the map of floor 2, left side
Click here to view the map of floor 1
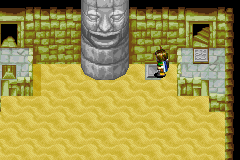
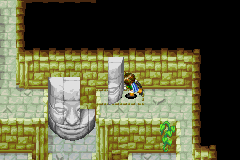
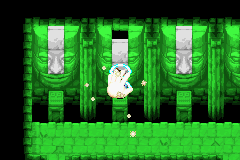
Here, go north and push the misplaced statue piece into
the right place. The face statue will spit out sand. Now
go back south and all the way back to the staircase you took
earlier, through the sand again and everything. Back down in floor 1, head east, then north and finally west. You will see two shrubs.
Use Whirlwind on the western one. Walk up the staircase.
|
 |
|
Click here to view
the map of floor 2, left side
Click here to view the map of floor
3
In floor 2, go east then north. In the next
room, go north and climb down the vine. Go west and take the
treasure chest. Now walk on the sand and use Sand to go through
the wall up north. Climb the vine in the northeast. Enter
the staircase. In floor 3, go west then south. Go east then
south and follow the corridor leading to a treasure chest.
Go all the way back to the staircase, and go south. Head south then east
into the next room.
|
 |
|
Click here to view
the map of floor 3
Go north and go west. Use Move to push the wooden pillar away. Now go all the way back to the staircase. Head west and go north. Stand on the sand and use Sand. You can now reach the treasure chest. Go all the way back to the staircase then all the way to the corridor where the path splits to the wooden pillar. This time head east and enter the next room.
This room is full of sand and a face statue. Notice the switches to your south and east. While you walk down the stairs, you will step on the first switch. Now go up to the other switch. When the sand level is the same as this switch, step on it. It removes the rock that blocks the door. Go up the stairs and take the staircase.
In floor 4, go west then south. In the next room, slide down the slope. You will fall on the middle part of floor 2.
|
 |
|
Click here to view the map of floor
2, center
Push the misplaced piece into its correct spot. Now go west to the door. Here go east and use Move on the wooden pillar to push it away. Head back to the room with the face statue. Climb down the vine and enter the door.
|
 |
|
Click here to view
the map of floor 1
Click here to view the map of floor
2, right side
Follow the corridor and climb down the
stairs. Simply use Sand in the next room. Go south and
you will be back in the room with gray statues. Jump south
and go east through the door. Here, follow the corridor until
you see a sand tunnel on the ground. Use Sand to get through
it, then go east and head up the stairs.
In floor 2, follow the corridor. Use Whirlwind
on the first bush. Inside grab the treasure. Go back out and
keep following the corridor into the next room. Here, climb
down the vine and go north until you see an incompleted statue.
Go west and climb up. Go up the stairs.
Click here to view
the map of floor 2, middle
Now go north and use Sand to pass
through the sand. Go east and use Whirlwind on the first bush
you see. Inside is a treasure chest. Come back out and continue
east. Follow the corridor and you will eventually enter another
sand room. The switch that unblocks the door is to the west.
Do the same thing you did with previous sand room. Head out the door.
|

|
|
Click here to view
the map of floor 2, center
Click here to view the map of floor
2, right
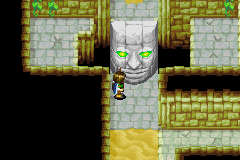
Here follow the corridor. Use Whirlwind on the first bush. Enter the room and go north. Push the pillar away and climb down. Jump across and get the treasure. Go back and exit the room. Go west and down a staircase. In floor 2, follow the long corridor into the next room. Go north in the next room and push the statue piece into place. The statue's eyes will become green. Now, go all the way back until you reach the staircase that brings you back to floor 2 middle. Now follow the corridor so it leads you into the sand room again. Keep following the path and use Sand when needed. After you use Sand, go south and take the staircase.
|
|
|
Click here to view
the map of floor 2, right side
It's better you save your file first before attempting the following. You should be prepared to click on your "A" button rapidly in order to bring up the menu in time. When you climb down the vine and jump across the gap, the green-eye statue will move towards you and push you south. When you see sand on the ground, bring up the menu and use Sand. You can then can avoid the statue by hidding into the sand. Come back up and go north. Use Sand again to sneak under the wall. Go all the way north and climb one of the vines. Follow the corridor and enter the staircase. Here go up another staircase.
|
 |
|
Click here to view
the map of floor 3
Here follow the path until you see sand and a pillar. Ignore them and go through the door south of you. In this room, use Reveal, then Move the statue piece into the middle. It will fall to the below floor. Take the staircase here and go down.
|
 |
|
Click here to view
the map of floor 3
In floor 2, move the piece into the right place. Sand will spit out from the statue. Take the staircase back up. In floor 3, go west and enter the next room. Go north, move away the pillar and use Sand to pass the blocks. Take the staircase down.
|
 |
|
Click here to view
the map of floor 4
In floor 3, go west and enter the door to
the south. Climb down the two vines. Go in front of the
sand waterfall and use Sand. Strive your way up. When you
climb to the next level, go east and climb the vine around to the
the staircase. Now, follow the corridor to the next
staircase. In the final room, sand yourself up when you see another
sand waterfall. Once you've reached the top of the sandfall, climb up the vine. You will then be at the top just like you were in
Shrine of the Sea God and Tundaria Tower. Take the trident
piece. Go back into the tower and use Retreat to leave.

|
 |
| Get a whole bunch of treasure chests |
|
Click here to view
the map of floor 1
Go back in the tower and go north to enter
the room with gray statues. You can use Move to pull out the
middle piece from the face. Here is what you will get (from
east to west):
Ice Powder
A corridor leads to a sand puzzle. You have to move a pillar
here.
Empty
Floor 3
Empty
Coins
Leads to a sand puzzle. You can use Sand to pass through only
if you have move the pillar away.
That's it for Ankohl Ruins. Leave.
|
 |
|